Disclaimer
I know I said I would be showing you how to retrain two neural nets to detect cats. However, I accidentally left a test running for a little longer than expected on Google Cloud ML and I ran out of free credits! If any of you fine readers would like to send me some credits or hook me up with a GPU I will get round to doing the next part of this blog series very swiftly! However, until then you can have a sneaky peak into the third part of the blog series!
Docker
What the heck is Docker?
Docker is incredible, the more I use it the more I love it. The reason being it allows you to create an environment that does not depend on your computer's operating system. This means if you create a docker container with something like python in you will be able to run that same container on a Mac, Window or a Linux PC. This has many advantages, a particular one being that anything you do inside the docker container will be reproducible. Since then one does not have to worry about whether someone has to install the Windows version or the Mac version etc. Docker containers also facilitate the rapid development work for Data Scientists, Web Developers, Software Engineers,... you name it! Here's a list of some reputable companies currently using Docker: BBC News, PayPal, Expedia, General Electric, Google, Amazon. There are also countless other things you can do with Docker, such as:
- Setting up a Docker swarm (or using Kubernetes) to orchestrate your containers.
- Using Docker containers to run continuous integration (using tools such as Jenkins, Travis, etc).
- Multiple users can use the same Docker container at once! This makes running browser based like IDE's Rstudio Server or JupyterHub very easy to setup and deploy.
How I have used Docker
First off I'll answer a slightly different question, 'Why I have used Docker in this blog'. The reason is, that I wanted the content of my blog to be fully reproducible for anyone that reads it and easily deployable by any keen readers too. The best way to do this in my experience was to 'Dockerize' anything that I was going to publish. So in the process of creating this blog I only used docker containers. I actually used 3 different containers for this development, one container running Jupyter notebooks using jupyter/tensorflow-notebook (with a few pip installs here and there). Another based off of Rstudio's rocker/geospatial which I used to develop the App and the final container which runs the finished Shiny App is based off of rocker/shiny. See below for the Dockerfiles for each of these builds:
RStudio Dockerfile
1
2
3
4
5
6
7
8
|
FROM rocker/geospatial
LABEL maintainer="Andy Challis <andrewchallis@hotmail.co.uk>"
RUN apt-get update && \
    apt-get install -y libav-tools && \
    apt-get install ffmpeg && \
    apt-get install -y python3-pip python3-dev && \
    pip3 install tensorflow pillow matplotlib && \
    Rscript -e "install.packages('shinyWidgets')"
|
Shiny Dockerfile
1
2
3
4
5
6
7
8
|
FROM rocker/shiny
LABEL maintainer="Andy Challis <andrewchallis@hotmail.co.uk>"
RUN apt-get update && \
    apt-get install -y libav-tools curl && \
    apt-get install ffmpeg && \
    apt-get install -y python3-pip python3-dev && \
    pip3 install tensorflow pillow matplotlib && \
    Rscript -e "install.packages('shinyWidgets')"
|
How to get in on the Docker action
If I have persuaded you to try out docker then follow the install instructions here, or click the links below for your operating system:
Windows Apple Ubuntu
Python - TensorFlow
Below is the Python code that I adapted from Google's TensorFlow GitHub repo
To use the RCNN model simpy change the parameter to MODEL_NAME = "faster_rcnn_resnet101_coco_11_06_2017"
  1
  2
  3
  4
  5
  6
  7
  8
  9
 10
 11
 12
 13
 14
 15
 16
 17
 18
 19
 20
 21
 22
 23
 24
 25
 26
 27
 28
 29
 30
 31
 32
 33
 34
 35
 36
 37
 38
 39
 40
 41
 42
 43
 44
 45
 46
 47
 48
 49
 50
 51
 52
 53
 54
 55
 56
 57
 58
 59
 60
 61
 62
 63
 64
 65
 66
 67
 68
 69
 70
 71
 72
 73
 74
 75
 76
 77
 78
 79
 80
 81
 82
 83
 84
 85
 86
 87
 88
 89
 90
 91
 92
 93
 94
 95
 96
 97
 98
 99
100
101
102
103
104
105
106
107
108
109
110
111
112
113
114
115
116
117
|
# object_detection_ssd.py

# — imports
import numpy as np
import os
import sys
import tensorflow as tf
import glob

import matplotlib
matplotlib.use('agg')
import matplotlib.pyplot as plt
from PIL import Image

# — Env setup
# This is needed since the notebook is stored in the object_detection folder.
sys.path.append('..')

# — Object detection imports
# Here are the imports from the object detection module.

from utils import label_map_util
from utils import visualization_utils as vis_util

# — Model preparation
# What model to use.

MODEL_NAME = 'ssd_mobilenet_v1_coco_11_06_2017'
PATH_TO_CKPT = MODEL_NAME + '/frozen_inference_graph.pb'

# List of the strings that is used to add correct label for each box.

PATH_TO_LABELS = os.path.join('data', 'mscoco_label_map.pbtxt')
NUM_CLASSES = 90

# — Load a (frozen) Tensorflow model into memory.

detection_graph = tf.Graph()
with detection_graph.as_default():
  od_graph_def = tf.GraphDef()

  with tf.gfile.GFile(PATH_TO_CKPT, 'rb') as fid:
    serialized_graph = fid.read()
    od_graph_def.ParseFromString(serialized_graph)
    tf.import_graph_def(od_graph_def, name='')

# — Loading label map
# Label maps map indices to category names, so that when our convolution network predicts 5,
# we know that this corresponds to airplane.
# Here we use internal utility functions, but anything that returns a dictionary mapping integers
# to appropriate string labels would be fine

label_map = label_map_util.load_labelmap(PATH_TO_LABELS)
categories = label_map_util.convert_label_map_to_categories(label_map, max_num_classes=NUM_CLASSES, use_display_name=True)
category_index = label_map_util.create_category_index(categories)

# — Helper code

def load_image_into_numpy_array(image):
  (im_width, im_height) = image.size
  return np.array(image.getdata()).reshape((im_height, im_width, 3)).astype(np.uint8)

# — Detection
PATH_TO_TEST_IMAGES_DIR = '../images'
TEST_IMAGE_PATHS = glob.glob(os.path.join(PATH_TO_TEST_IMAGES_DIR, '*.jpg'))
PATH_TO_OUT_DIR = '../output_images'
TEST_IMAGE_OUT_PATH = [ os.path.join(PATH_TO_OUT_DIR, os.path.basename(i)) for i in TEST_IMAGE_PATHS]

# Size, in inches, of the output images.
IMAGE_SIZE = (6,  4)
with detection_graph.as_default():
  with tf.Session(graph=detection_graph) as sess:
    # Definite input and output Tensors for detection_graph
    image_tensor = detection_graph.get_tensor_by_name('image_tensor:0')

    # Each box represents a part of the image where a particular object was detected.
    detection_boxes = detection_graph.get_tensor_by_name('detection_boxes:0')

    # Each score represent how level of confidence for each of the objects.
    # Score is shown on the result image, together with the class label.
    detection_scores = detection_graph.get_tensor_by_name('detection_scores:0')
    detection_classes = detection_graph.get_tensor_by_name('detection_classes:0')

    num_detections = detection_graph.get_tensor_by_name('num_detections:0')

    i=1
    for image_path, out_path in zip(TEST_IMAGE_PATHS, TEST_IMAGE_OUT_PATH):
      image = Image.open(image_path)
      # the array based representation of the image will be used later in order to prepare the
      # result image with boxes and labels on it.
      image_np = load_image_into_numpy_array(image)

      # Expand dimensions since the model expects images to have shape: [1, None, None, 3]
      image_np_expanded = np.expand_dims(image_np, axis=0)

      # Actual detection.
      (boxes, scores, classes, num) = sess.run(
          [detection_boxes, detection_scores, detection_classes, num_detections],
          feed_dict={image_tensor: image_np_expanded})

      # Visualization of the results of a detection.
      vis_util.visualize_boxes_and_labels_on_image_array(
          image_np,
          np.squeeze(boxes),
          np.squeeze(classes).astype(np.int32),
          np.squeeze(scores),
          category_index,
          use_normalized_coordinates=True,
          line_thickness=8)

      plt.figure(figsize=IMAGE_SIZE)
      plt.imshow(image_np)
      plt.axis('off')

      plt.savefig(out_path, bbox_inches='tight')
      plt.close()
      i += 1
|
The two models that I decided to implement were a Faster-RCNN-ResNet and an SSD-MobileNet. These sound scary but if we break down what they actually mean it might make a little more sense as to what they actually are.
Faster-RCNN-ResNet
This model can be broken down into three parts as you can probably tell by the name! An RCNN is a Region-based Convolution Neural Network and it aims to propose regions of an image to be passed through a Convolutional Neural Network to compute features, these features are then passed through an SVM (Support Vector Machine) to be classified with an associated probability. This is easier to understand in a diagram:
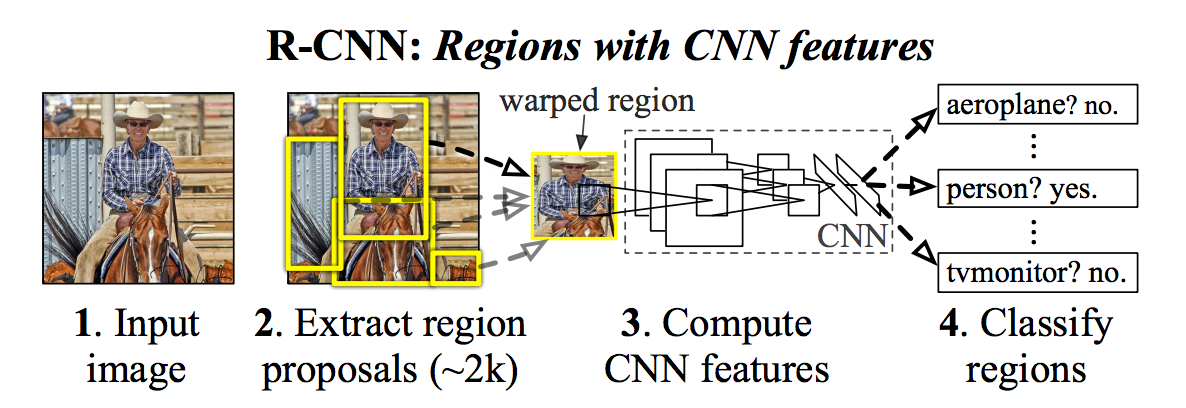
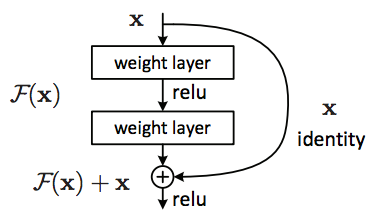
Now these models can take weeks to train and to have a powerful model you would normally try to have a deep network. But the deeper the network the more expensive it is to train. Luckily some boffins at Microsoft came up with the idea of using a Residual Network or ResNet for short. These ResNets require less parameters (weights) than their regular counterparts and can therefore be used to create deeper models with a reduced expense. The residual block in the network essentially provides a kind of shortcut if the input of the next block and output of the previous block are of the dimension.
Finally the Faster RCNN part, this should be obvious! It's a faster version, it does this by sharing convolutions across region proposals. The region proposals are usually done using algorithms like Selective Search or EdgeBoxes.
SSD-MobileNet
Let's break this down again, an SSD is a Single Shot MultiBox Detector, it aims to be just as accurate as the Faster-RCNN-ResNet is but much faster! In fact it clocks in at around 59 frames per second in comparison to 7 FPS for the bulky Faster-RCNN-ResNet. It does this by 'eliminating bounding box proposals and the subsequent pixel or feature resampling stage'. The model does this by a few improvements such as 'using a small convolutional filter to predict object categories and offsets in bounding box locations, using separate predictors (filters) for different aspect ratio detections, and applying these filters to multiple feature maps from the later stages of a network in order to perform detection at multiple scales'
MobileNets are based on a streamlined architecture that uses depth-wise separable convolutions to build light weight deep neural networks. The name pointing out an obvious use case, for the deployment of models on devices with less resources such as mobiles. This means it is perfect to deploy into a Shiny App! For a comparison in model size if you download the Shiny App I created the SSD-MobileNet takes up 29.2MB vs the Faster-RCNN-ResNet coming in at a whopping 196.9MB. I'd urge you to give the Shiny App a go so you can see how much faster the SSD-MobileNet is than the Faster-RCNN-ResNet model, it's very impressive!
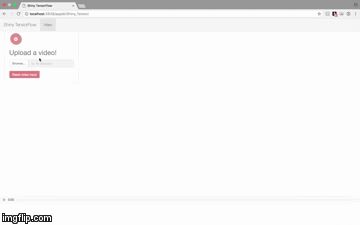
R - Shiny
Download Full Shiny App
 1
 2
 3
 4
 5
 6
 7
 8
 9
10
11
12
13
14
15
16
17
18
19
20
21
22
23
24
25
26
27
28
29
30
31
32
33
34
35
36
37
38
39
40
41
42
43
44
45
46
47
48
49
50
51
52
53
54
55
56
57
58
59
60
61
62
63
64
65
66
67
68
69
70
71
72
73
74
75
76
77
78
79
80
81
82
83
84
85
86
87
88
89
90
91
92
93
94
95
96
|
# server.R

library(shiny)

options(shiny.maxRequestSize=3000*1024^2)

# Define server logic required to draw a histogram
shinyServer(function(input, output) {

  print(getwd())

  values <- reactiveValues(
    upload_state = NULL
  )

  observeEvent(input$video, {
    values$upload_state <- 'uploaded'
  })


  observeEvent(input$reset, {
    values$upload_state <- 'reset'
  })

  observeEvent(input$frame_rate, {
    values$upload_state <- 'settings updated'
  })
  observeEvent(input$model, {
    values$upload_state <- 'settings updated'
  })


  file_input <- reactive({
    if (is.null(values$upload_state)) {
      return(NULL)
    } else if (values$upload_state == 'uploaded') {
      return(input$video)
    } else if (values$upload_state == 'settings updated') {
      file.remove("www/output.mp4")
      unlink('www/images', recursive = T,force=T)
      unlink('www/output_images', recursive = T, force=T)
      return(input$video)
    } else if (values$upload_state == 'reset') {
      file.remove("www/video.mp4")
      file.remove("www/output.mp4")
      unlink('www/images', recursive = T,force=T)
      unlink('www/output_images', recursive = T, force=T)
      return(NULL)
    }
  })


  output$video <- renderUI({
    inFile <- file_input()

    file.copy(inFile$datapath, "www/video.mp4")

    if (!is.null(inFile)){
      dir.create("www/images")
      dir.create("www/output_images")

      withProgress(message = 'Getting the motor started!', value = 0, {

        incProgress(1/4, message = "Converting video into frames ")
        system(paste0("ffmpeg -i www/video.mp4 -r ", input$frame_rate ," www/images/image%04d.jpg"))
        file.remove("www/video.mp4")

        if (input$model == "RCNN"){
          model = "cd www/object_detection && python3 object_detection_rcnn.py"
        }else if (input$model == "SSD"){
          model = "cd www/object_detection && python3 object_detection_ssd.py"
        }
        incProgress(1/4, message = paste0("Passing images through ", input$model," model"))
        system(model)
        unlink('www/images', recursive = T,force=T)

        incProgress(1/4, message = "Converting into a video")
        system(paste0("ffmpeg -y -framerate ", input$frame_rate, " -i www/output_images/image%04d.jpg www/output.mp4"))
        unlink('www/output_images', recursive = T, force=T)
      })
    }

    tags$video(src="output.mp4",
               type="video/mp4",
               autoplay=NA,
               controls=NA,
               width='100%',
               height=700)

  })

  on.exit(expr = file.remove("www/video.mp4"))
  on.exit(expr = file.remove("www/output.mp4"), add = TRUE)
  on.exit(expr = unlink('www/images', recursive = T, force=T), add = TRUE)
  on.exit(expr = unlink('www/output_images', recursive = T, force=T), add = TRUE)
})
|
 1
 2
 3
 4
 5
 6
 7
 8
 9
10
11
12
13
14
15
16
17
18
19
20
21
22
23
24
25
26
27
28
29
30
31
32
33
34
35
36
37
38
39
40
41
42
|
# ui.R

library(shinyWidgets)

navbarPage("Shiny TensorFlow", id="nav",

           tabPanel("Video",
                    div(class="outer",

                        tags$head(
                          # Include our custom CSS
                          includeCSS("www/styles.css")
                        ),


                        # If not using custom CSS, set height of leafletOutput to a number instead of percent
                        uiOutput("video", width="100%", height="100%"),

                        # Shiny versions prior to 0.11 should use class = "modal" instead.
                        absolutePanel(id = "controls", class = "panel panel-default", fixed = TRUE,
                                      draggable = TRUE, top = 60, right = "auto", left = 20, bottom = "auto",
                                      width = 330, height = "auto",


                                      dropdownButton(
                                        sliderInput('frame_rate', label=h3('Frame rate'),
                                                    min=1, max=10, value=1),
                                        selectInput('model', h3('Model'),
                                                    choices = c("RCNN", "SSD"),
                                                    selected = "SSD",
                                                    multiple = FALSE),
                                        circle = TRUE, status = "danger", icon = icon("gear"),
                                        width = "300px"),
                                      fileInput(inputId = "video",
                                                label = h2('Upload a video!'),
                                                multiple = F,accept = "video"),
                                      actionButton('reset', status = "danger", 'Reset video input')

                        )
                    )
           )
)
|
 1
 2
 3
 4
 5
 6
 7
 8
 9
10
11
12
13
14
15
16
17
18
19
20
21
22
23
24
25
26
27
28
29
30
31
32
33
34
35
36
37
38
39
40
41
42
43
44
45
46
47
48
49
|
/* www/styles.css */

input[type="number"] {
  max-width: 80%;
}

div.outer {
  position: fixed;
  top: 41px;
  left: 0;
  right: 0;
  bottom: 0;
  overflow: hidden;
  padding: 0;
}

/* Customize fonts */
body, label, input, button, select {
  font-family: 'Helvetica Neue', Helvetica;
  font-weight: 200;
}
h1, h2, h3, h4 { font-weight: 400; }

#controls {
  /* Appearance */
  background-color: white;
  padding: 0 20px 20px 20px;
  cursor: move;
  /* Fade out while not hovering */
  opacity: 0.65;
  zoom: 0.9;
  transition: opacity 500ms 1s;
}
#controls:hover {
  /* Fade in while hovering */
  opacity: 0.95;
  transition-delay: 0;
}

#reset{color: #f5f5f5;background-color: #d43636;border-color: #ccc;}
.progress-bar{background-color:#3c763d;}
.shiny-file-input-progress {display: none}

.shiny-notification{
  position: fixed;
  top: 33%;
  left: 33%;
  right: 33%;
}
|
How deploy this Shiny App on your machine
Note: To be able to run the Faster-RCNN-ResNet model from the Docker container you may have to increase your allocated memory for the Docker virtual machine to around 5GB.
 1
 2
 3
 4
 5
 6
 7
 8
 9
10
11
12
13
14
|
# Make a directory to store shinyapp in
mkdir -p PATH/TO/SHINY/shinyapps/appdir
mkdir -p PATH/TO/SHINY/shinylogs

# Run the docker container remotely on port 3838 and
# mount the shinyapps directory and shiny logs directory
docker run --rm -p 3838:3838 \
    -v PATH/TO/SHINY/shinyapps:/srv/shiny-server/ \
    -v PATH/TO/SHINY/shinylog/:/var/log/shiny-server/ \
    challisa/shiny-object

# Now download the Shiny app from:
# https://www.dropbox.com/sh/flgqwqwdy7hdv03/AACLBocFjqZIwOrTeyHOByRta?dl=0
# and put it into PATH/TO/SHINY/shinyapps/appdir
|
Final outcome