Python: Creating a Facial Analysis API

Demo

Note: I am using a free tier option on Heroku to host my API as a service, this means it will shut itself down and will be slow for the first attempt as it starts up the container.

Note also: If you’re face is not detected it may be because part of your face is covered by your hair. Also the models used in this API use DLib’s frontal face detector. Which means if you are not facing the camera it may not detect your face. I also restricted the number of faces to only allow one face to save computation.

More important note: This will not work on mobiles as the javascript needs updating for full cross browser support.

Load Demo

Inspiration

The inspiration for this article came from MachineBox where they offer their products free for open source projects. MachineBox are really making waves with their on-premises containerisation of machine learning capabilities. The particular inspiration for this blog came from their FaceBox product which is incredibly powerful and simple to run. However, I wanted to add in some extra features into my API such as Landmark Detection and Pose Estimation.

You can see the whole project over on my GitHub repo
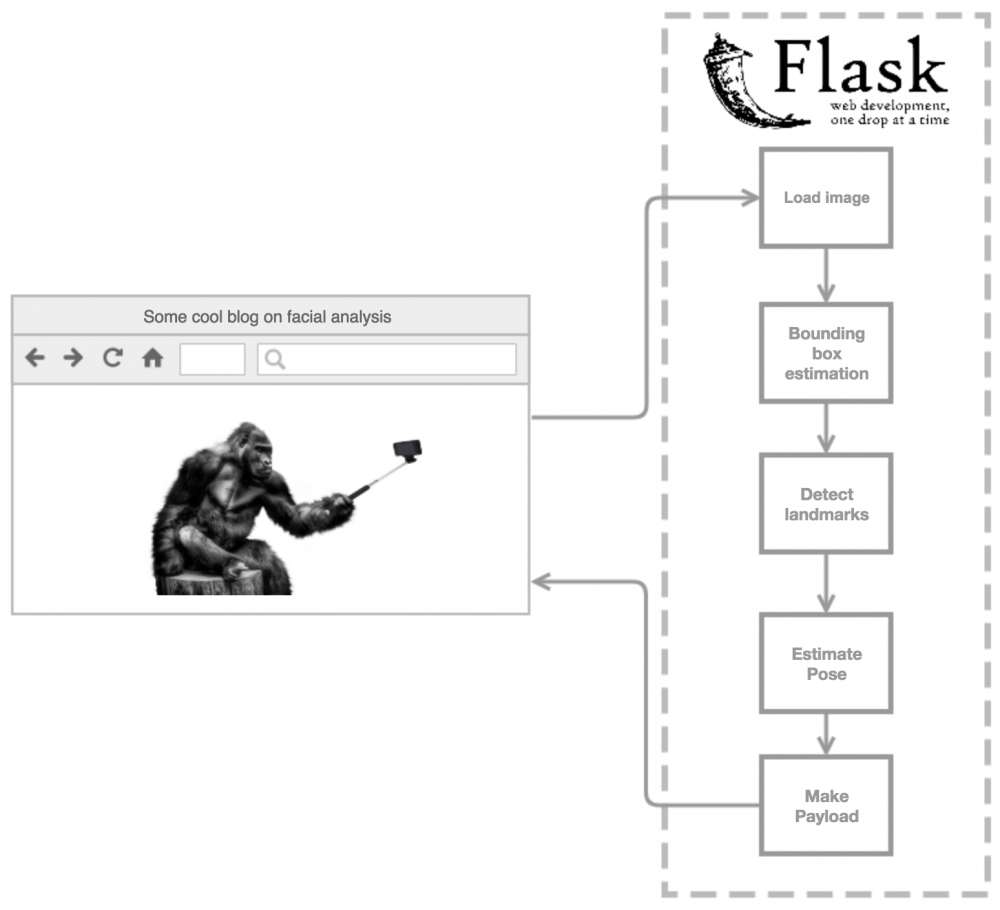
High Level Overview

Building an Environment

As usual we will be using Docker to create a reproducable environment. By doing this from the outset of development we can ensure that the API will be horizontally scalable, that way, if we were to somehow get over 500 requests per minute, we could just spin up another container. We also want to make this container as light as possible so we should start from an alpine Docker image and build it up from there.

Note: If this was to be productionalised it could be made even lighter by reducing the number of layers and removing any unnessesary libraries.

  1
  2
  3
  4
  5
  6
  7
  8
  9
 10
 11
 12
 13
 14
 15
 16
 17
 18
 19
 20
 21
 22
 23
 24
 25
 26
 27
 28
 29
 30
 31
 32
 33
 34
 35
 36
 37
 38
 39
 40
 41
 42
 43
 44
 45
 46
 47
 48
 49
 50
 51
 52
 53
 54
 55
 56
 57
 58
 59
 60
 61
 62
 63
 64
 65
 66
 67
 68
 69
 70
 71
 72
 73
 74
 75
 76
 77
 78
 79
 80
 81
 82
 83
 84
 85
 86
 87
 88
 89
 90
 91
 92
 93
 94
 95
 96
 97
 98
 99
100
FROM python:3-alpine3.6

ENV CC="/usr/bin/clang" CXX="/usr/bin/clang++" OPENCV_VERSION="3.3.0"

RUN echo -e '@edgunity https://nl.alpinelinux.org/alpine/edge/community\n\
@edge https://nl.alpinelinux.org/alpine/edge/main\n\
@testing https://nl.alpinelinux.org/alpine/edge/testing\n\
@community https://dl-cdn.alpinelinux.org/alpine/edge/community'\
  >> /etc/apk/repositories

RUN apk add --update --no-cache \
  # --virtual .build-deps \
      build-base \
      openblas-dev \
      unzip \
      wget \
      cmake \
      #Intel® TBB, a widely used C++ template library for task parallelism'
      libtbb@testing  \
      libtbb-dev@testing   \
      # Wrapper for libjpeg-turbo
      libjpeg  \
      # accelerated baseline JPEG compression and decompression library
      libjpeg-turbo-dev \
      # Portable Network Graphics library
      libpng-dev \
      # A software-based implementation of the codec specified in the emerging JPEG-2000 Part-1 standard (development files)
      jasper-dev \
      # Provides support for the Tag Image File Format or TIFF (development files)
      #tiff-dev \
      # Libraries for working with WebP images (development files)
      #libwebp-dev \
      # A C language family front-end for LLVM (development files)
      clang-dev \
      linux-headers \
      # Additional python packages
      && pip install numpy imutils requests flask

RUN mkdir /opt && cd /opt && \
  wget https://github.com/opencv/opencv/archive/${OPENCV_VERSION}.zip && \
  unzip ${OPENCV_VERSION}.zip && \
  rm -rf ${OPENCV_VERSION}.zip

RUN mkdir -p /opt/opencv-${OPENCV_VERSION}/build && \
  cd /opt/opencv-${OPENCV_VERSION}/build && \
  cmake \
  -D CMAKE_BUILD_TYPE=RELEASE \
  -D CMAKE_INSTALL_PREFIX=/usr/local \
  -D WITH_FFMPEG=NO \
  -D WITH_IPP=ON \
  -D WITH_OPENEXR=NO \
  -D WITH_TBB=YES \
  -D BUILD_EXAMPLES=NO \
  -D BUILD_ANDROID_EXAMPLES=NO \
  -D INSTALL_PYTHON_EXAMPLES=NO \
  -D BUILD_DOCS=NO \
  -D BUILD_opencv_python2=NO \
  -D BUILD_opencv_python3=ON \
  -D PYTHON3_EXECUTABLE=/usr/local/bin/python \
  -D PYTHON3_INCLUDE_DIR=/usr/local/include/python3.6m/ \
  -D PYTHON3_LIBRARY=/usr/local/lib/libpython3.so \
  -D PYTHON_LIBRARY=/usr/local/lib/libpython3.so \
  -D PYTHON3_PACKAGES_PATH=/usr/local/lib/python3.6/site-packages/ \
  -D PYTHON3_NUMPY_INCLUDE_DIRS=/usr/local/lib/python3.6/site-packages/numpy/core/include/ \
  .. && \
  make VERBOSE=1 && \
  make && \
  make install && \
  rm -rf /opt/opencv-${OPENCV_VERSION}

# Making an app directory
RUN mkdir -p /app/data/models && \
    mkdir  /app/src && \
    mkdir  /app/data/input && \
    mkdir  /app/data/output

# Facial landmark detection model
RUN cd /app/data/models && \
	wget https://dlib.net/files/shape_predictor_68_face_landmarks.dat.bz2 && \
	bzip2 -d shape_predictor_68_face_landmarks.dat.bz2

# Installing dlib
RUN apk add --no-cache git && \
	git clone https://github.com/davisking/dlib.git && \
	cd dlib/examples && mkdir build && cd build && cmake .. -DUSE_AVX_INSTRUCTIONS=ON && cmake --build . --config Release && \
	cd ../.. && python setup.py install

# Baking code into container
ADD src/*.py /app/src/

# Adding alias for the client
RUN echo 'alias client="clear && python /app/src/client.py"' >> ~/.profile && \
    source ~/.profile

RUN pip install --no-cache-dir flask-cors Flask-Uploads pytest pytest-xdist pytest-sugar

# Running our API as the entrypoint
WORKDIR /app/src
ENTRYPOINT ["python"]
CMD ["server.py"]

For conveniance we can also create a docker-compose file to save the user having to have knowledge of Docker to be able to start this container with the configurations.

 1
 2
 3
 4
 5
 6
 7
 8
 9
10
11
12
13
14
version: "2"
services:
  opencv:
    build: .
    image: challisa/opencv
    container_name: opencv-wordpress
    ports:
      - "8686:8686"
    volumes:
      - ./src:/app/src
    stdin_open: true
    tty: true
    environment:
      - PORT=8686

Creating a Flask API

This should be relatively simple implementation of Flask, as we always expect to recieve an image and we will send back a payload describing the image. We will seperate this out into a file called server.py which will import the Facial Analysis object that we create in the next section.

Note we also import two other files: settings.py and helpers.py. The helper function is a wrapper that will send an abort message (400 error) if at any point the Facial Analysis fails. We also pull through a variable from settings.py whether we will be upsampling the image when running the bounding box detection.

 1
 2
 3
 4
 5
 6
 7
 8
 9
10
11
12
13
14
15
16
17
18
19
20
21
22
from flask import Flask, request, Response
from flask_cors import CORS
import os

import helpers
import settings
from oo_face import FaceAPI as FaceAPIv1

# Initialize the Flask application
app = Flask(__name__); CORS(app, resources=r'/api/*')


@helpers.abort_on_fail
@app.route('/api/v1/face', methods=['POST'])
def check_image():
    face = FaceAPIv1(blob=request.files['image'], upsample_bb=settings.upscale_bb)
    payload = face.get_payload(verbose=False)
    return Response(response=payload, status=200, mimetype="application/json")


# start flask app (tried processes=8 threaded was much better)
app.run(host="0.0.0.0", port=int(os.getenv('PORT')), debug=True, threaded=True)

Developing a Facial Analysis Object

Since we may be getting multiple requests at a time and we want to implement multi-threading to improve the performance of our API it makes sense to create an instance with arributes and methods for each of the algorithms we will be using. Therefore we will be creating a Facial Analysis object. We will be incorporating three main methods; bounding box estimation, facial landmark detection and pose estimation.

Note that we will have some dependancies to manage and hence will have to split the multithreading into different sections. Pose estimation is dependant on the facial landmarks, which are also dependant on the bounding box estimation.

Before we can get to all of these fancy algorithms we have to be able to load the image from our API. We will do this along with some other convenience operations when we initialise the object.

 1
 2
 3
 4
 5
 6
 7
 8
 9
10
11
12
13
14
15
16
17
18
19
20
21
22
23
24
25
26
27
28
29
30
31
32
33
34
35
36
37
38
39
from time import time
import cv2

import helpers

class FaceAPI(object):
    '''This class will analyze a given photo (tested formats: jpg) and return
    a payload of information it found regarding the image supplied.

    Example:
        python3
        face = FaceAPI(blob=request.files['image'])
        pl = face.get_payload(verbose=True)

    Profiling: ~10ms per image
    '''

    def __init__(self, blob, upsample_bb=0):
        '''
        Set upsample_bb=1 to upsample the image during face detection on
        bounding box method, note that it comes with a time cost
        '''
        self.start_time = time()
        self.upsample_bb = upsample_bb

        # Loads FileStorage object from flask or path
        self.blob = helpers.load_blob(blob)
        self.file_name = self.blob.filename

        # Load the image from byte string, get attributes and greyscale
        self.original_image = helpers.load_image(self.blob)
        self.grey_image = cv2.cvtColor(self.original_image, cv2.COLOR_BGR2GRAY)
        self.height, self.width, _ = self.original_image.shape

        # Initial settings for vars
        self.BoundingBoxContained = False
        self.Reason = ''

        self.main()

Bounding Box Estimation

Theory – see pyimagesearch

 1
 2
 3
 4
 5
 6
 7
 8
 9
10
11
12
13
14
15
16
17
18
19
20
21
22
23
24
25
26
27
28
29
30
31
32
33
34
35
36
import dlib

import helpers

detector = dlib.get_frontal_face_detector()

class FaceAPI(object):

    #... see above section for init
        
    def get_bounding_box(self):
        '''
        Detects all faces within the supplied image if there is only 1 face
        detected then it will add a bounding box to the data using DLIB's
        face detector

        Example: https://dlib.net/face_detector.py.html
        '''
        rects = detector(self.grey_image, self.upsample_bb)
        self.FacesCount = len(rects)

        if self.FacesCount < 1:
            self.Reason += 'No faces detected'
        elif self.FacesCount > 1:
            self.Reason += 'Detected {} faces'.format(self.FacesCount)
        else:
            self._bounding_box = rects[0]
            self.BoundingBox = helpers.prettify_bb(rects[0])

            self.BoundingBoxContained = self.BoundingBox['Left'] > 0 and \
                   self.BoundingBox['Left'] + self.BoundingBox['Width'] <  self.width and \
                   self.BoundingBox['Top'] > 0 and \
                   self.BoundingBox['Top'] + self.BoundingBox['Height'] < self.height
            self.Reason += "Bounding box wasn't contained" if not self.BoundingBoxContained else ''

        self.Success = bool(self.FacesCount) and self.BoundingBoxContained

Facial Landmark Detection

Theory – see learnopencv

 1
 2
 3
 4
 5
 6
 7
 8
 9
10
11
12
13
14
15
16
17
18
19
20
21
22
23
24
25
26
import dlib

import helpers
import settings

predictor = dlib.shape_predictor(settings.facial_landmarks_model)

class FaceAPI(object):

    #... see above section for init + bounding box

    def get_facial_landmarks(self):
        '''
        Adds facial landmarks to the data using DLIB's facial landmark predictor

        Example: https://dlib.net/face_landmark_detection.py.html
        '''
        self.facial_landmarks = helpers.shape_to_np(predictor(self.grey_image, self._bounding_box))
        self.PointChin = self.facial_landmarks[8]
        self.PointNose = self.facial_landmarks[30]
        self.PointLeftEyeLeft = self.facial_landmarks[36]
        self.PointRightEyeRight = self.facial_landmarks[45]
        self.PointMouthLeft = self.facial_landmarks[48]
        self.PointMouthRight = self.facial_landmarks[54]
        self.PointCheekLeft = self.facial_landmarks[0]
        self.PointCheekRight = self.facial_landmarks[16]

Pose Estimation

Theory – see learnopencv

 1
 2
 3
 4
 5
 6
 7
 8
 9
10
11
12
13
14
15
16
17
18
19
20
21
22
23
24
25
26
27
28
29
30
31
32
33
34
35
36
37
38
39
40
41
42
43
44
45
46
47
48
49
50
51
52
53
54
55
56
57
58
59
60
import math
import numpy as np
import cv2
 
class FaceAPI(object):
 
    #... see above section for init + facial landmarks

    def get_pose(self):
        '''
        Uses the Facial landmarks to make an approximation to the persons pose
        obviously we need to make some assumptions on the camera angle, position
        focal length etc
        We also use an appoximated 3d facial model found from:
        (https://www.learnopencv.com/head-pose-estimation-using-opencv-and-dlib/)
        The projections found come from:
        (https://github.com/jerryhouuu/Face-Yaw-Roll-Pitch-from-Pose-Estimation-using-OpenCV)
        '''
        #2D image points.
        image_points = np.array([
            self.PointNose, self.PointChin, self.PointLeftEyeLeft,
            self.PointRightEyeRight, self.PointMouthLeft, self.PointMouthRight
                                ], dtype='double')
        # 3D model points.
        model_points = np.array([
                                    (0.0, 0.0, 0.0),             # Nose tip
                                    (0.0, -330.0, -65.0),        # Chin
                                    (-225.0, 170.0, -135.0),     # Left eye left corner
                                    (225.0, 170.0, -135.0),      # Right eye right corne
                                    (-150.0, -150.0, -125.0),    # Left Mouth corner
                                    (150.0, -150.0, -125.0)      # Right mouth corner

                                ])

        # Camera internals
        center = (self.width/2, self.height/2)
        focal_length = center[0] / np.tan(60/2 * np.pi / 180)
        camera_matrix = np.array(
                             [[focal_length, 0, center[0]],
                             [0, focal_length, center[1]],
                             [0, 0, 1]], dtype = 'double'
                             )

        dist_coeffs = np.zeros((4,1)) # Assuming no lens distortion
        (success, rotation_vector, translation_vector) = cv2.solvePnP(model_points, image_points, camera_matrix, dist_coeffs, flags=cv2.SOLVEPNP_ITERATIVE)

        axis = np.float32([[500,0,0], [0,500,0], [0,0,500]])

        imgpts, jac = cv2.projectPoints(axis, rotation_vector, translation_vector, camera_matrix, dist_coeffs)
        modelpts, jac2 = cv2.projectPoints(model_points, rotation_vector, translation_vector, camera_matrix, dist_coeffs)
        rvec_matrix = cv2.Rodrigues(rotation_vector)[0]

        proj_matrix = np.hstack((rvec_matrix, translation_vector))
        eulerAngles = cv2.decomposeProjectionMatrix(proj_matrix)[6]

        pitch, yaw, roll = [math.radians(theta) for theta in eulerAngles]

        self.Roll = np.round(-math.degrees(roll), settings.payload_scores_dp); self.RollPFN = [int(x) for x in np.round(imgpts[0].ravel())]
        self.Pitch = np.round(math.degrees(pitch), settings.payload_scores_dp); self.PitchPFN = [int(x) for x in np.round(imgpts[1].ravel())]
        self.Yaw = np.round(math.degrees(yaw), settings.payload_scores_dp); self.YawPFN = [int(x) for x in np.round(imgpts[2].ravel())]

Designing a Front End

I’m not going to claim to have spent the time in designing the front end that I used! I started off by using Dan Markov’s “Take a selfie with javascript” jsfiddle. Once we have this set up we simplay have to add an API call when the photo is taken. We can do this using an AJAX call, once the photo has been taken it will be stored in a canvas object which we can convert to a blob and send that to our API.

Note: drawResponse is a function that draws the bounding box, pose and facial landmarks ontop of our canvas.

Note: showResponse is a function that displays the response from the API using renderjson.js below the image.

Note: We also define a modal using the tingle.js library

 1
 2
 3
 4
 5
 6
 7
 8
 9
10
11
12
13
14
15
16
17
18
19
20
21
22
23
24
25
26
27
function sendToAPI() {
  var canvas = document.querySelector('canvas');
  var FACEAPI ='https://0.0.0.0:8686/api/v1/face';
  canvas.toBlob(function (blob) {
    var formData = new FormData();
    formData.append('image', blob, 'webcam_' + (new Date).getTime().toString() + '.jpg');
    $.ajax(FACEAPI, {
      method: 'POST',
      data: formData,
      processData: false,
      contentType: false,
      success: function(response) {
        showResponse(response);
        if (response.Success) {
          drawResponse(response, canvas);
        } else {
          modal.setContent(response.Reason);
          modal.open();
        }

      },
      error: function (msg) {
        console.log(msg);
      }
    });
  });
}
comments powered by Disqus